

Make Your Own Digital Bubble Sheets / Multiple -Choice Answer Sheets with Google Forms
 Answer forms, bubble sheets, Scantron sheets… whatever you call them, they have become a real time saver for teachers when using multiple choice assessment. Now you can make your own digital answer sheets with Google Forms. You get detailed item analysis in the form of a spreadsheet and your students get immediate feedback. You can place your questions within the forms, but students can take screenshots of the questions if you don’t have a lockdown browser. The tutorial below will show you how to make a simple answer sheet that you can use with any printed test.
Start by Creating a New Google Form

1) Navigate to https://docs.google.com/forms/ and start a new form.
Name Your Form and Add Student Identifiers


2) Click to rename your form.
3) Change “Untitled Question” to “Period.”
4) Click on “Option 1” and change it to “1”
5) Click on “Add Option” and change it to “2.” Repeat for all of the class periods that you teach.
6) Toggle “Required” on.
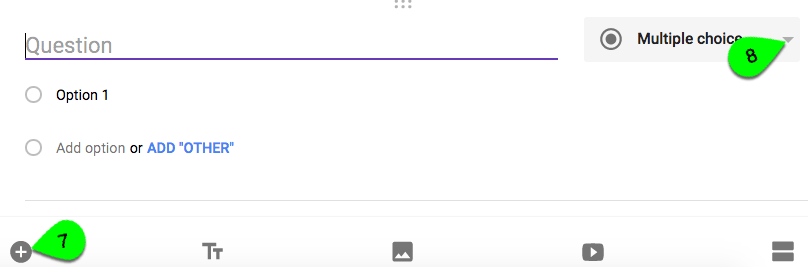
7) Click to add a new question.
8) Click the arrow to change the question type to “Short answer.”

9) Change “Question” to “First Name.”
10) Toggle “Required” on.
11) Click to duplicate the question

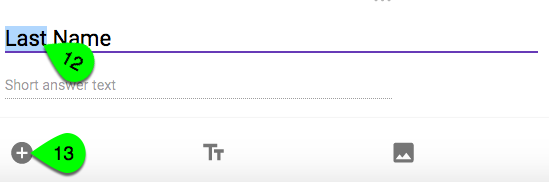
12) Change the duplicated question to “Last Name”
13) Click to add another question.
NOTE: You may wish to add a field for email if appropriate. This way students can receive grades once their assignment has been checked.

14) Change the question type to “Multiple choice grid.”
15) Replace “Question” with your directions.
16) Change “Row 1” to “1”
17) Click “Add Option”
18) Change “Column 1” to “A”
19) Click “Add Option” and Add

20) Change “Row 2” to “2”
21) Click “Add Option”
Repeat until you have created a row for each question.
22) Change “Column 2” to “B”
23) Click “Add Option”
Repeat until you have created a column for each answer choice.

24) Toggle “Require one response per row” on.
Preview and Share Your Answer Sheet

 25) Go to the top of your screen and name your form if you haven’t already.
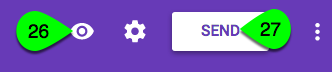
26) Click the eye icon to preview your form.
27) Click “Send” to see sharing options.
 28) Select how you would like to share your form (email, url, embed code).
29) Copy the link (or code if you choose to embed) and share with your students.

30) You can view student responses to questions by clicking “Responses” at the top of your form.
I’ll share an easy way to automatically grade the responses using Flubaroo in my next post.
Stay tuned for my next post on how to automatically grade submissions to your answer sheets in minutes.
Sign up for my email to be notified by email when new posts are published.
Scantron is a registered trademark of Scantron Corproration.
Don't Miss a Pick - Follow Us


